
You will probably notice a poor English language. Sorry for that. I am French.
I also captured quickly pictures during the game. Sorry for the quality.
Playing the 1942 campaign
Here are some highlights of the first game I played.
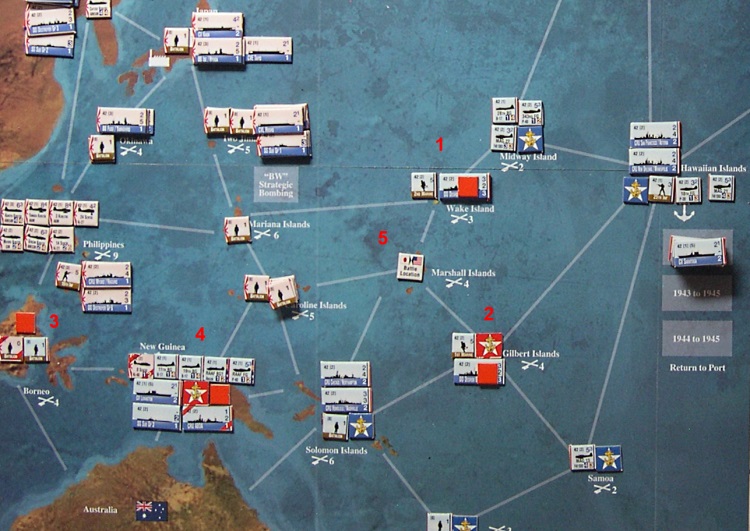 Here above is the situation during the last battle of turn 1.
I won 2 small battles in Wake and Gilbert Islands (1 and 2)
thanks to US Marines coming from reinforcement. The battle in Borneo (3) is not a priority.
It's a draw. In New Guinea, I almost won but one aircraft survived. This looks good but
in reality, this will be a major problem during game turn 2.
First golden rule I will discover later:
"Golden Rrule 1: if one survives, others will come during the next turn"
Here above is the situation during the last battle of turn 1.
I won 2 small battles in Wake and Gilbert Islands (1 and 2)
thanks to US Marines coming from reinforcement. The battle in Borneo (3) is not a priority.
It's a draw. In New Guinea, I almost won but one aircraft survived. This looks good but
in reality, this will be a major problem during game turn 2.
First golden rule I will discover later:
"Golden Rrule 1: if one survives, others will come during the next turn"The last battle is in progress around the Marshall Islands (5). 2 Japanese aircraft carriers with their escort are in the Japanese ocean (1). These are very dangerous units but only way to attack in the Japanese Ocean is through aircrafts or submarine. But the attack by submarine has a very low chance of success (1/5). The Island (2) is already lost. So the battle is lost because the US ships are leaving the islands at the end of the game turn. I should have come with infantry (beginner mistake). In the US Ocean, a US carrier with an escort and a Japanese submarine (that will take one hit later). The battle is very quick: only one turn (4).

Turn 2
After the strategic movements of turn 2, the situation looks surprising. Here I understood the Pacificfog of war and the golden rule 2: "During each turn, there will be unexpected big battles somewhere."
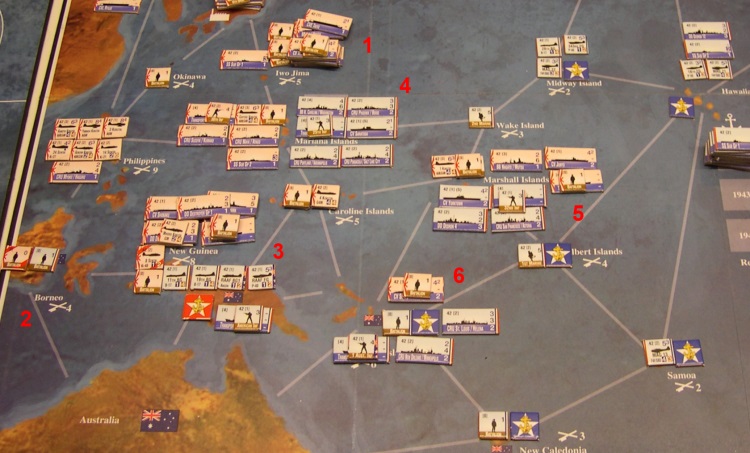
The Mariana Islands (4) are my main target for this turn. It's a crossroad for Japanese forces coming from Japan and I want to survive here to attract Japanese forces and win some time during the following turns. In theory, it was also a way to preserve South Pacific but the New Guinea invasion (3) anihilated this part of the plan. There is another nice battle in the Marshall Islands (5) and A a Japanese Aircraft Carrier is coming in the Solomon Islands (6).
After the battles, the US naval units are back in Hawaii so the map is cleaned.

At that time, I lost one aircraft carrier, 4 planes, 2 infantry units. Japanese lost 2 minor ships (CRU), 5 planes and one infantry. During battles, many aircraft carrier planes are lost but they are automatically rebuild. There are also low cost Japanese Infantry (Batallion) coming for free following different kind of events.
Turn 3
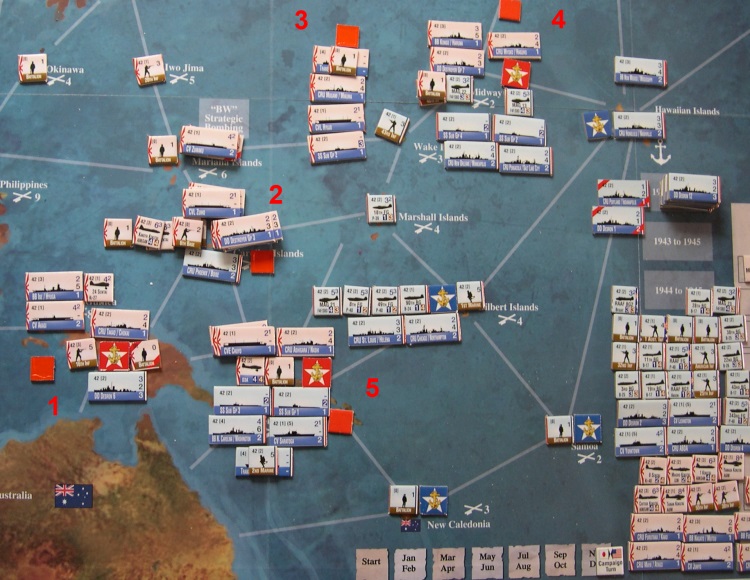
Starting turn 3, I decided to maintain the effort on the Mariana (4) (crossroad strategy). Most of the Japanese forces left Iwo Jima and moved to Mariana (4) and Solomon (3). One group also attacked Borneo (1). There was also a small battle in the Marshall (2).

Here below is the situation after the battles: I survived in the Mariana (1) and in the Solomon (2). I lost Borneo (3) and I won Marshall with one damage (4). On the right side (5), you can see the destroyed units. I lost another Aircraft Carrier and an escort. The Japanese also lost one Aircraft Carrier. But I also discovered the golden rule 6 of the 1942 scenario: "Whatever you will do, you will face Japanese Aircraft Carriers". The US forces have only 6 aircraft carriers. The Japanese forces are made of 8 Aircraft Carriers, 4 light aircraft carriers and 4 escort aircraft carriers. At the begining of the scenario, 6 aircraft carriers, 3 light aircraft carriers and 1 escort carriers are in Japan but they will slowly move to the battlefield. In the Mariana battle this turn, 4 Japanese aircraft carriers were involved.

Mid of the game, I lost most of my battles. However, the situation is not so bad. I only lost 2 objectives (for a total of 8) and the Japanese forces did not progress so much.
Turn 4: this is time for the Midway battle. And we are only one month late.
Starting turn 4 (July), I was weak and I needed to focus on defending the objectives. The trick was here to use US scouting airplanes to anticipate Japanese movements. However, after the strategic movements, I felt under pressure:

Turn 5
Starting turn 5, the situation after the strategic movements looks stable.

I tried to defend the Solomon (4), and I am fighting hard for the Gilbert (5) and Midway (6).

Turn 6
And here comes the last turn.

So I won but I can't be proud of the final situation.
Solitaire rules are nice because anybody can test improvements. So next time I will increase the game difficulty by modifying the Japanese Order 5-6: "1 Closer to Hawaii that has Japanese Forces Ashore" will be replaced by "1 closer to Hawaii". This will make a huge pressure on Hawaii. The option "that has Japanese Forces Ashore" has clearly been implemented to make the game easier.